Securing your Linux system should be one of the first tasks carried out upon initial log into the system. Misconfiguration during this stage could potentially mean locking yourself out of your server so it is usually a good idea to have a second session open at the same time to ensure you are still logged in in the second session to revert any changes if you find yourself logged out of the first session.
We also provide a VNC console for dedicated servers or KVM over IP for dedicated servers for remote access should you find yourself locked out.
To secure you system, simply follow the following steps:
Step 1 — Creating a New User
Once you are logged in as root, you’ll be able to add a new user account. It is best pratice to use a privileged account to carry out tasks rather than using root directly. Using the useradd and passwd command, create a new user and change their password.
Step 2 — Granting Administrative Privileges
Now we have a new user account with regular account privileges, we can set up what is known as superuser or root privileges for our normal account. This will allow our normal user to run commands with administrative privileges by putting the word sudo before the command.
To add these privileges to our new user, we need to add the user to the wheel or sudo group dependant on distribution.
RHEL/CentOS/AlmaLinux/RockyLinux/Fedora
Now, when logged in as your regular user, you would need to type sudo before commands to run them with superuser privileges.
Step 3 — Create SSH Keys
Creation of SSH Keys can be achieved a number of ways:
- With Putty-gen
- With an existing Linux Server
Putty-Gen
PuTTYgen is an key generator tool for creating SSH keys for PuTTY. It is analogous to the ssh-keygen tool used in some other SSH implementations.
PuTTYgen download and install
PuTTYgen is normally installed as part of the normal PuTTY .msi package installation. There is no need for a separate PuTTYgen download. Download the PuTTY installation package.
Running PuTTYgen
Go to Windows Start menu → All Programs → PuTTY → PuTTYgen.
Creating a new key pair for authentication
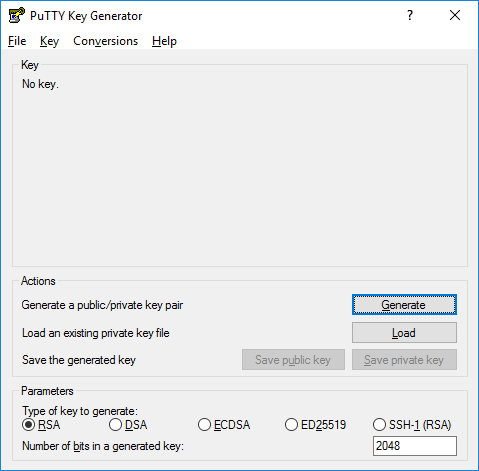
To create a new key pair, select the type of key to generate from the bottom of the screen (using SSH-2 RSA with 2048 bit key size is good for most people; another good well-known alternative is ECDSA).
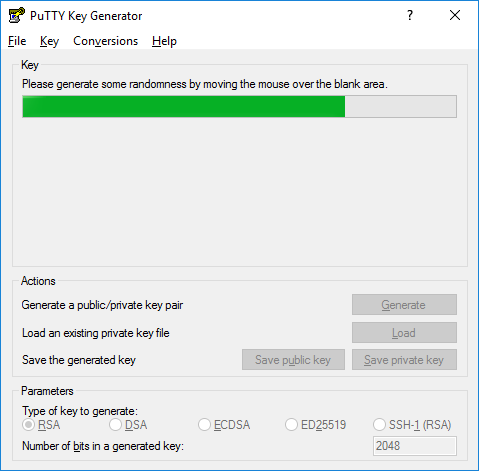
Then click Generate, and start moving the mouse within the Window. Putty uses mouse movements to collect randomness. The exact way you are going to move your mouse cannot be predicted by an external attacker. You may need to move the mouse for some time, depending on the size of your key. As you move it, the green progress bar should advance.
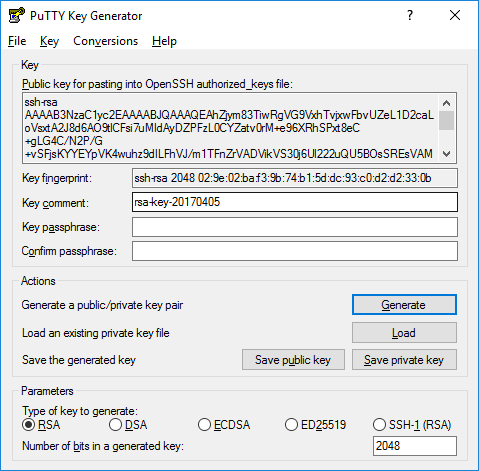
Once the progress bar becomes full, the actual key generation computation takes place. This may take from several seconds to several minutes. When complete, the public key should appear in the Window. You can now specify a passphrase for the key.
You should save at least the private key by clicking Save private key. It may be advisable to also save the public key, though it can be later regenerated by loading the private key (by clicking Load).
We strongly recommended using a passphrase be for private key files intended for interactive use. If keys are needed for automation (e.g., with WinSCP, then they may be left without a passphrase.
Existing Linux Server
The first step is to create a key pair on the client machine (usually your computer):
By default, ssh-keygen will create a 2048-bit RSA key pair, which is secure enough for most use cases (you may optionally pass in the -b 4096 flag to create a larger 4096-bit key).
After entering the command, you should see the following prompt:
Generating public/private rsa key pair.
Enter file in which to save the key (/your_home/.ssh/id_rsa):
Press ENTER to save the key pair into the .ssh/ subdirectory in your home directory, or specify an alternate path.
If you had previously generated an SSH key pair, you may see the following prompt:
/home/your_home/.ssh/id_rsa already exists.
Overwrite (y/n)?
If you choose to overwrite the key on disk, you will not be able to authenticate using the previous key anymore. Be very careful when selecting yes, as this is a destructive process that cannot be reversed.
You should then see the following prompt:
Enter passphrase (empty for no passphrase):
Here you optionally may enter a secure passphrase, which is highly recommended. A passphrase adds an additional layer of security to prevent unauthorized users from logging in. To learn more about security, consult our tutorial on How To Configure SSH Key-Based Authentication on a Linux Server.
You should then see the following output:
Your identification has been saved in /your_home/.ssh/id_rsa.
Your public key has been saved in /your_home/.ssh/id_rsa.pub.
The key fingerprint is:
a9:49:2e:2a:5e:33:3e:a9:de:4e:77:11:58:b6:90:26 username@remote_host
The key's randomart image is:
+--[ RSA 2048]----+
|     ..o         |
|   E o= .        |
|    o. o         |
|        ..       |
|      ..S        |
|     o o.        |
|   =o.+.         |
|. =++..          |
|o=++.            |
+-----------------+
You now have a public and private key that you can use to authenticate. The next step is to place the public key on your server so that you can use SSH-key-based authentication to log in.
Adding Public keys to servers can be achieved in a number of ways also:
- Using our Control Panel
- Using an existing Linux Server
- Uploading Keys via SSH
- Manually Uploading
Via Control Panel
Log into your user account. In the left menu tabs, select SSH Keys then select the Add SSH Key tab, give your key a name and paste in the public key.

Via Linux Server
The quickest way to copy your public key to the CentOS host is to use a utility called ssh-copy-id. Due to its simplicity, this method is highly recommended if available. If you do not have ssh-copy-id available to you on your client machine, you may use one of the two alternate methods provided in this section (copying via password-based SSH, or manually copying the key).
The ssh-copy-id tool is included by default in many operating systems, so you may have it available on your local system. For this method to work, you must already have password-based SSH access to your server.
To use the utility, you need only specify the remote host that you would like to connect to and the user account that you have password SSH access to. This is the account to which your public SSH key will be copied.
The syntax is:
ssh-copy-id<username>@<remote-server>
The authenticity of host '203.0.113.1 (203.0.113.1)' can't be established.
ECDSA key fingerprint is fd:fd:d4:f9:77:fe:73:84:e1:55:00:ad:d6:6d:22:fe.
Are you sure you want to continue connecting (yes/no)? yes
This means that your local computer does not recognize the remote host. This will happen the first time you connect to a new host. Type yes and press ENTER to continue.
Next, the utility will scan your local account for the id_rsa.pub key that you created earlier. When it finds the key, it will prompt you for the password of the remote user’s account:
/usr/bin/ssh-copy-id: INFO: attempting to log in with the new key(s), to filter out any that are already installed
/usr/bin/ssh-copy-id: INFO: 1 key(s) remain to be installed -- if you are prompted now it is to install the new keys
username@203.0.113.1's password:
Type in the password (your typing will not be displayed for security purposes) and press ENTER. The utility will connect to the account on the remote host using the password you provided. It will then copy the contents of your ~/.ssh/id_rsa.pub key into a file in the remote account’s home ~/.ssh directory called authorized_keys.
You should see the following output:
Number of key(s) added: 1

Now try logging into the machine, with:   "ssh 'username@203.0.113.1'"
and check to make sure that only the key(s) you wanted were added.
Step 4 — Test Connection, remove password authentication
Now that an SSH key-pair has been set-up for the privileged user, it is best to test the keys before continuing, with a different shell session, try and log into the server. If there was no prompt for a password and no error, then we cab continue.
We now want to remove password authentication and root login so that the root user account will no longer be able to log in via SSH.
If you were able to login to your account using SSH without a password, you have successfully configured SSH-key-based authentication to your account. However, your password-based authentication mechanism is still active, meaning that your server is still exposed to brute-force attacks.
Before completing the steps in this section, make sure that you either have SSH-key-based authentication configured for the root account on this server, or preferably, that you have SSH-key-based authentication configured for a non-root account on this server with sudo privileges. This step will lock down password-based logins, so ensuring that you will still be able to get administrative access is crucial.
Once you’ve confirmed that your remote account has administrative privileges, log into your remote server with SSH keys, either as root or with an account with sudo privileges. Then, open up the SSH daemon’s configuration file:
Inside the file, search for a directive called PasswordAuthentication & PermitRootLogin. This may be commented out. If it is, press i to insert text, and then uncomment the line by deleting the # in front of the PasswordAuthentication directive. When you find the directive, set the value to no. This will disable your ability to log in via SSH using account passwords:
...
PasswordAuthentication no
PermitRootLogin no
...
When you are finished making changes, press ESC and then :wq to write the changes to the file and quit. To implement these changes, you need to restart the sshd service:
As a precaution, open up a new terminal window and test that the SSH service is functioning correctly before closing this session:
Once you have verified your SSH service, you can safely close all current server sessions.
The SSH daemon on the server now only responds to SSH keys. Password-based authentication has successfully been disabled.
Step 6 — Implementing A basic Firewalls With iptables
Start by resetting your firewall rules so that you can review how policies can be built from the command line. Flush all of your rules by running the following:
Now verify that your rules are reset:
You should have output that shows the rules in the filter table are gone and that the default policy is set to ACCEPT on all chains:
-P INPUT ACCEPT
-P FORWARD ACCEPT
-P OUTPUT ACCEPT
Next, you will create all of your protocol-specific chains. These will be used to hold the rules that create exceptions to your deny policy for services you want to expose:
Next, add the exception for SSH traffic. SSH uses TCP, so you’ll add a rule to accept TCP traffic destined for port 22 to the TCP chain:
If you want to add additional TCP services, you can do that now by repeating the command with the port number replaced.
In the INPUT chain, where all incoming traffic begins filtering, we need to add our general purpose rules. These are some common sense rules that set the baseline for our firewall by accepting traffic that’s low risk (local traffic and traffic that’s associated with connections we’ve already checked) and dropping traffic that is clearly not useful (invalid packets).
First, create an exception to accept all traffic that is part of an established connection or is related to an established connection:
sudo iptables -A INPUT -m conntrack --ctstate ESTABLISHED,RELATED -j ACCEPT
This rule uses the conntrack extension, which provides internal tracking so that iptables has the context it needs to evaluate packets as part of larger connections instead of as a stream of discrete, unrelated packets. TCP is a connection-based protocol, so an established connection is fairly well-defined. For UDP and other connectionless protocols, established connections refer to traffic that has seen a response (the source of the original packet will be the destination of the response packet, and vice versa). A related connection refers to a new connection that has been initiated in association with an existing connection. The classic example here is an FTP data transfer connection, which would be related to the FTP control connection that has already been established.
You’ll also want to allow all traffic originating on the local loopback interface. This is traffic generated by the server and destined for the server. It is used by services on the host to communicate with one another
sudo iptables -A INPUT -i lo -j ACCEPT
Finally, deny all invalid packets. Packets can be invalid for a number of reasons. They may refer to connections that do not exist, they may be destined for interfaces, addresses, or ports that do not exist, or they may be malformed. In any case, you’ll drop all invalid packets since there is no proper way to handle them and because they could represent malicious activity:
Creating the Jump Rules to the Protocol-Specific Chains
So far, we’ve created some general rules in the INPUT chain and some rules for specific acceptable services within our protocol-specific chains. However, right now, traffic comes into the INPUT chain and has no way of reaching our protocol-specific chains.
Now you need to direct traffic in the INPUT chain into the appropriate protocol-specific chains. You can match on protocol type to send it to the right chain. Also, ensure that the packet represents a new connection (any established or related connections should already be handled earlier). Start with UDP traffic:
sudo iptables -A INPUT -p udp -m conntrack --ctstate NEW -j UDP
Next, run the following command for TCP traffic. Please note that with TCP packets, you’ll add the additional requirement that the packet is a SYN packet, which is the only valid type to start a TCP connection:
Then run the following for ICMP traffic:
Rejecting All Remaining Traffic
If a packet that was passed to a protocol-specific chain did not match any of the rules within, control will be passed back to the INPUT chain. Anything that reaches this point should not be allowed by your firewall.
You’ll deny the traffic using the REJECT target, which sends a response message to the client. This allows you to specify the outbound messaging so that you can mimic the response that would be given if the client tried to send packets to a regular closed port. The response is dependent on the protocol used by the client.
Attempting to reach a closed UDP port will result in an ICMP message stating “port unreachable”. You can imitate this by running the following:
Attempting to establish a TCP connection on a closed port results in a TCP RST response:
For all other packets, you can send a ICMP “protocol unreachable” message to indicate that the server doesn’t respond to packets of that type:
Adjusting Default Policies
The last three rules you added should handle all remaining traffic in the INPUT chain. However, you should set the default policy to DROP as a precaution, as in the following:
You should also set this policy in the FORWARD chain if this server isn’t configured as a router to other machines:
Then run the following for FORWARD:
Finish up by setting the policy for OUTPUT:
This should replicate your rules set fairly closely.
Saving iptables Rules
At this point, you should test your firewall rules and make sure they block the traffic you want to keep out while not hindering your normal access. Once you’re satisfied that your rules are behaving correctly, you can save them so that they will be automatically applied to your system at boot.
Save your current rules (both IPv4 and IPv6) by running the following:
This will overwrite your /etc/iptables/rules.v4 and /etc/iptables/rules.v6 files with the policies you crafted on the command line.


